Profile Options
As of version 2.7, Picard supports multiple profiles that can quickly switch between option settings. This page allows for the management of those user-defined option profiles.
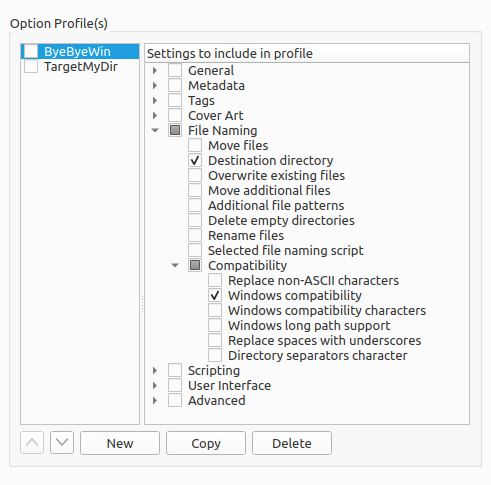
Initially, the list of profiles will be empty. To create a new profile click on the New button. This will create a profile with no options selected for the profile to manage. To rename the profile, right-click on the profile name and select the command.
The options that the profile is to manage are selected from the list in the right-hand pane. Options can be selected either by group or individually. The groups can be expanded to see the individual options belonging to that group.
The profile stack order can be rearranged either by selecting a profile and using the up and down arrow buttons below the list, or by dragging the profile to a new position in the stack. Profiles are enabled when the box beside the profile’s name is checked.
Changes made to a profile’s options settings, enabled status, or position in the profile stack will be reflected in the option settings displayed on the other pages. Options that are controlled by an enabled profile will be shown as highlighted. Hovering your cursor over the highlighted option will identify which profile currently controls the setting. Settings are always displayed based on the first enabled profile in the profile stack, which corresponds to the setting that will be used during processing.
Warning
It is important to understand that when you click the Make It So! button all of the option settings on all pages will be saved. If an option is managed by one or more profiles that are currently enabled, the option will be highlighted and it will be saved to the first enabled profile in the profile stack that manages the option. If there are no enabled profiles that manage the option, the option will not be highlighted and it will be saved to the “user settings” profile which is the user’s normal settings, contains all options, is at the bottom of the profile stack, and is always enabled. The “user settings” profile cannot be modified and is not shown in the profile management page.
Backing Up and Sharing Profiles
You have the ability to export option profiles for backup purposes or to share with others, and import option profiles previously exported.
Exporting a profile definition
When you click the Export button, the currently selected (highlighted) profile can be output to a file. The export contains the following information:
title of the profile
unique identifier assigned to the profile
version of the profile export format used
version of Picard that created the profile export
date that the profile was exported
list of which settings are controlled by the profile
values of the settings controlled by the profile
You will first be asked to select the mode for the export.

The choices for the export mode are:
Share: All sensitive data such as account identification, passwords and directory paths will be excluded from the export. This option is the default, and should be used for any exports that you plan to make public or share with others.
Backup: Nothing will be excluded from the export. This should only be selected for personal backup copies of your profiles that are not shared with others.
Once you have confirmed your choice of export mode, a file browser dialog will open to allow you to select the directory and file name of the output file. The profile exports are saved as *.toml files, which can be viewed or modified with a text editor.
You can also export a profile in “Share” mode to the clipboard from the context menu displayed when you right-click on the profile.

Importing a profile definition
To import a profile definition, you click the Import button. This allows you to import the profile either from a profile export file, or from a profile definition currently in the clipboard. If importing from a file, a file browser dialog will open to allow you to select the file to import.
Once the import source has been selected, Picard will verify that the import is a valid profile definition. If it is valid, a new profile based on the profile definition imported will be added at the top of your list of profiles.
Note
When importing a profile definition, if there is already a profile with the same name in your list, you are prompted as to whether you want to create a new copy or overwrite the existing profile.

If you choose to create a copy, the new profile will be added with a copy number appended to the title, such as “ByeByeWin (2)”.
When you import a profile, you are also prompted as to whether you want the new profile to be enabled after import.
See also
Please see the Option Profiles section for a detailed explanation of the profile system.