Metadata Pane
When a file is selected in the Cluster Pane, the Metadata Pane will display the differences between the original tags found in the file metadata and the new tags that will be written to the file.
When a track is selected in the Album Pane and there is no file matched to the track, the Metadata Pane will display the differences between the original tags found in the metadata retrieved from MusicBrainz and the new tags that will be written to the file.
When a file that has been matched to a track is selected in the Album Pane, the Metadata Pane will display the differences between the original tags found in the file and the new tags that will be written to the file.
In all cases, the original metadata is displayed in the middle column, and the new metadata is displayed in the right-hand column.

Note that selected files can be saved from either the Cluster Pane, or the Album Pane when matched to a track. The tags written will be those associated with the appropriate save location.
Tag Differences Display
When there are differences between the original and new metadata tags, Picard will highlight the differences for easy identification of the changes. Additions will be highlighted in green, and deletions will be highlighted in red.
In addition, the tag name in the first column will be highlighted in a different color. Modified tags will be highlighted in yellow, added tags will be highlighted in green, and deleted tags will be highlighted in red.
Note that track time differences at or below the threshold specified in the Matching option settings will not be indicated as changed, and will not be highlighted.
Tag Actions
A number of actions can be taken with respect to a tag in the Metadata Pane. These include:
Editing the tag’s value
Adding the tag to the “Preserve Tags” list
Removing the tag
Copying the tag’s value to the clipboard
Replacing the tag’s value by pasting from the clipboard
These actions can be accessed from the context menu brought up by right-clicking on a tag.
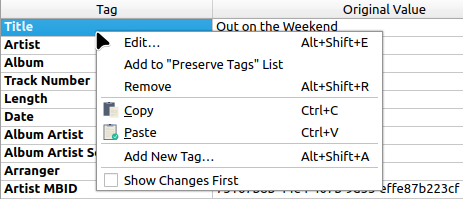
The context menu also provides actions to add a new tag, and an option to display the changed tags at the top of the list.
Editing Metadata
To begin editing a tag’s value, you can double-click the value to edit it in-place. You can also edit the tag in the tag editor, brought up from the context menu or by pressing Alt+Shift+E (⌥+⇧+E on macOS). Note that double-clicking a multi-value tag always opens the tag editor.

Note that the tag editor displays multi-value tags as a list of tags, and normal tags as a list with only one item.
From the tag editor, you can select which tag to edit from the drop down list at the top of the editor. You can also add a new tag by entering the new tag name in the tag selector.
Once you have edited a tag, the right-click context menu for that tag shows two additional actions:
Use Original Values: This will reset the tag back to the original value.
Merge Original Values: This will merge the original values into the list of current values, creating a multi-value tag as required.
You can edit multiple files or tracks at once by selecting them in the Cluster Pane or Album Pane before performing the edits. The edits will change the values for all selected items to the same value. This should be used with caution because you could end up with unwanted results, such as accidentally setting all track titles to be the same.